Homestead Pantry Essentials: 12 Things We Always Keep Stocked (And Why)
This post contains affiliate links. If you purchase through my links, I may earn a small commission at no extra cost to you. I only recommend products I actually use in my ranch kitchen.
If there is one thing ranch life has taught me, it is this: the pantry is the heartbeat of the homestead. Not the garden, not the animals, not the equipment. The pantry.
When the weather turns, when the budget gets tight, when you just don’t want to make a store run — the pantry is what keeps you fed, calm, and in control. And it doesn’t have to be complicated or expensive to build.
I spent years overcomplicating my homestead pantry essentials. Buying things I didn’t use, running out of things I always needed, and generally making it harder than it had to be. This post is everything I wish someone had handed me at the beginning — the actual list of what we keep stocked year-round on the ranch, why each item earns its shelf space, and how to start building yours without spending a fortune.
“The pantry is not a Pinterest project. It’s a working tool. Stock it like one.”
1. Why Homestead Pantry Essentials Are Different From a Regular Pantry
A regular pantry is what you have left after grocery shopping. A homestead pantry is something you build intentionally — stocked to carry you through gaps, weather events, busy seasons, and the weeks when the garden isn’t producing yet.
The goal isn’t to stockpile for disaster. It’s to create a buffer between you and the grocery store so you’re cooking from your shelves instead of running out every few days. Once you have that buffer, everything about homestead life gets easier.
The categories that matter most: whole grains, legumes, fats and oils, natural sweeteners, acids and preserving agents, and fermentation supplies. Everything else builds from there.

2. Homestead Pantry Essentials: The Grains Category
Grains are the foundation of everything. Bread, porridge, thickening soups, fermenting — it all starts here. These are what we keep stocked at all times.
Unbleached Bread Flour
This is non-negotiable if you’re baking sourdough. I always use unbleached — the bleaching process strips out the natural yeasts and enzymes that make sourdough work. Keep at least 10 pounds on hand at all times. I go through more than that most weeks.
Whole Wheat Flour
I add a small percentage of whole wheat to almost every sourdough loaf — it adds depth of flavor and nutrition. It also gives your starter a boost. A 5-pound bag goes a long way when you’re using it as a blend.
Rolled Oats
Oats are one of the most versatile pantry items on the shelf. Breakfast, granola, adding to bread, thickening soups. Buy them in bulk if you can — the per-unit cost drops significantly.
A Note on Grain Milling
Once you’re baking regularly and want to take things to the next level, milling your own grain is a game changer. Freshly milled flour has more flavor, more nutrition, and a quality you simply can’t get from a bag. I won’t link a specific mill just yet — but it is on my list of things I genuinely love and will share more about soon.
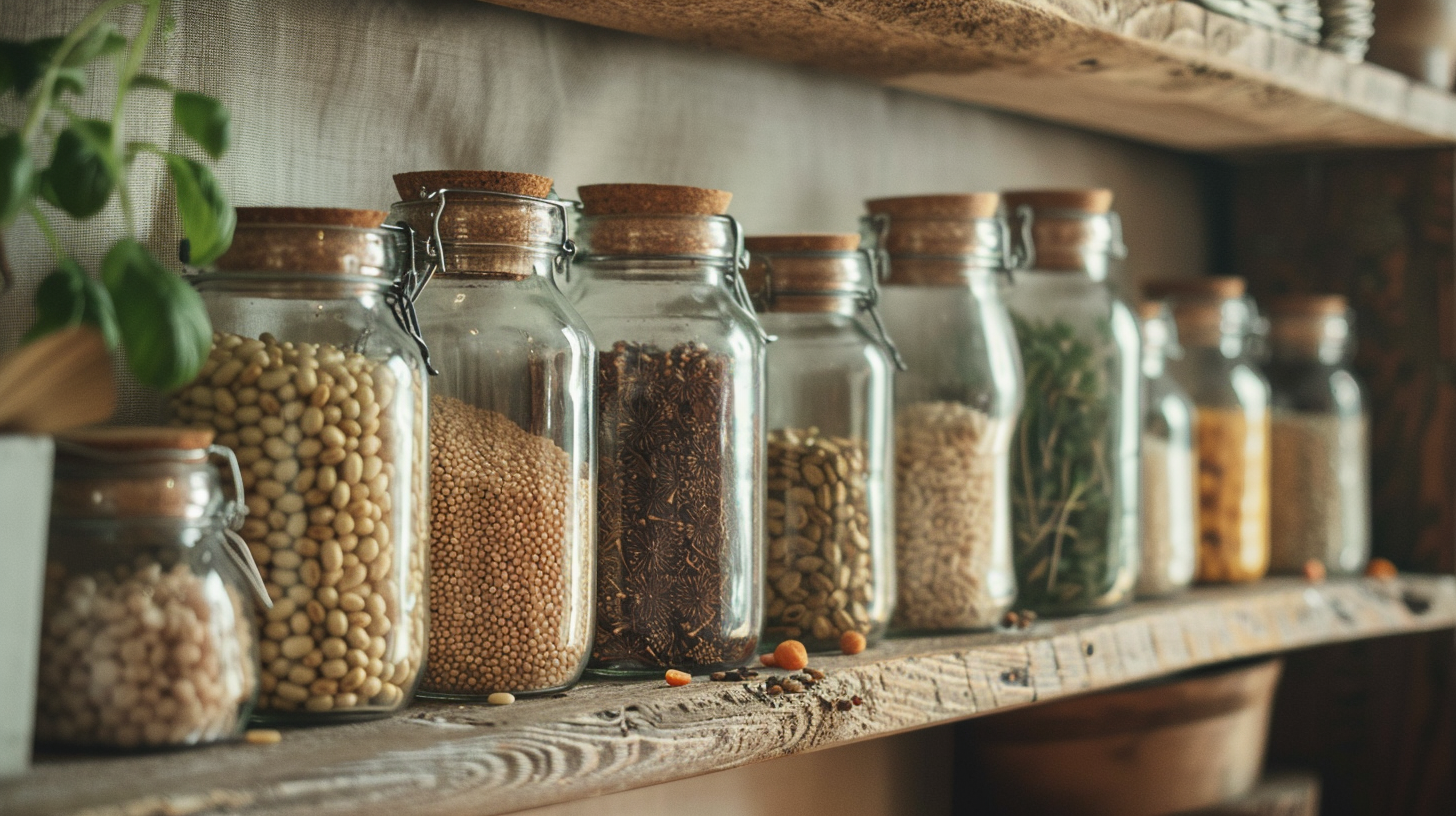
3. Homestead Pantry Essentials: The Legumes Category
Dried beans and legumes are the most underrated item in any homestead pantry. Cheap, shelf-stable for years, endlessly versatile, and genuinely filling. If you’re building a pantry on a budget, start here.
- Dried black beans
- Pinto beans
- Lentils — red and green cook faster than other legumes and don’t need soaking
- Chickpeas
- Split peas for soups
Buy them dry, store them in sealed mason jars, and they will outlast almost everything else on your shelf.
I keep a running supply of Wide Mouth Mason Jars— they work for legumes, grains, dried herbs, sourdough starter, and a dozen other things. Buy more than you think you need.
4. Homestead Pantry Essentials: Fats, Oils, and Acids
These are the workhorses of the ranch kitchen. They preserve, they flavor, they make everything taste like it was made with intention.
Extra Virgin Olive Oil
For cooking, finishing, and making everything taste better. Buy a quality bottle — you’ll use it constantly.
Coconut Oil
Neutral flavor, high smoke point, and shelf-stable for a long time. I use it for baking and high-heat cooking.
Apple Cider Vinegar
Fermentation, salad dressings, cleaning, supporting gut health — apple cider vinegar is one of those things you’ll reach for more than you expect. Get the raw, unfiltered kind with the mother.
Salt — More Than You Think You Need
Salt is not just seasoning — it’s a preservation tool. We keep three kinds: fine sea salt for everyday cooking, coarse kosher salt for meat and bread, and pickling salt specifically for fermentation. Iodized salt inhibits fermentation, so don’t use it for your sourdough starter or fermented vegetables.

5. Homestead Pantry Essentials: Natural Sweeteners and Flavor Builders
A well-stocked homestead pantry doesn’t rely on refined sugar for everything. These natural sweeteners do double duty — flavor and function.
Raw Honey
Local raw honey is my first choice. It never expires, it can be used medicinally, it’s a natural preservative, and it tastes infinitely better than processed honey. I buy it by the quart from a local farm when I can.
Pure Maple Syrup
For baking, oatmeal, and glazing. The real thing — not pancake syrup. A little goes a long way.
Molasses
Adds depth to bread, beans, and baked goods. Blackstrap molasses is genuinely nutritious — high in iron and minerals. I use it in whole wheat sourdough loaves for a richer flavor.
Dried Herbs and Spices
The ones I always have: garlic powder, onion powder, smoked paprika, cumin, oregano, thyme, bay leaves, black pepper, red pepper flakes, and cinnamon. Grow and dry your own when you can — the flavor difference is real.
6. The Fermentation Corner of Your Homestead Pantry Essentials
If you’re not fermenting yet, your pantry is missing its most powerful section. Fermented foods are shelf-stable, deeply nutritious, and one of the most satisfying things you can make from scratch.
The basics you need to get started: non-iodized salt, filtered water, and wide-mouth mason jars. That’s it. From those three things you can make sauerkraut, fermented salsa, pickles, kimchi, and a dozen other things.
Your sourdough starter belongs in this category too — if you don’t have one yet, my post on how to make a sourdough starter from scratch walks you through the whole process. It costs almost nothing and it changes the way you think about food.
7. Questions About Homestead Pantry Essentials
How much does it cost to stock a homestead pantry from scratch?
You can build a solid foundational pantry for $150–$300 if you buy strategically. Start with the grains and legumes first — they’re the cheapest and most versatile. Add oils, vinegars, and sweeteners next. Don’t try to do it all at once.
How do I store pantry staples long-term?
Mason jars are your best friend for dry goods — they’re airtight, stackable, and you can see exactly what you have. For larger quantities, food-grade buckets with gamma seal lids work well for flour and grains. Keep everything away from heat, light, and moisture.
What’s the difference between a homestead pantry and just having a full kitchen?
A homestead pantry is intentional and redundant — you always have at least one backup of the things you use most. A full kitchen just means you did the shopping. The homestead pantry is built to carry you through gaps, not just the week.
Do I need special equipment to stock a homestead pantry?
The only things you really need are good storage containers and a reliable kitchen scale for measuring and portioning. Everything else is optional — though airtight canisters make a big difference once your pantry starts growing.
How long do pantry staples last?
White rice and dried beans can last 25+ years in proper storage. Whole wheat flour lasts 6–12 months. Refined white flour lasts 1–2 years. Honey never expires. Olive oil lasts 18–24 months. Salt and vinegar last indefinitely. Spices don’t go bad but lose potency after 1–2 years.
Should I stock my pantry all at once or build it gradually?
Gradually — always. Pick one category per month and build it out. Month one: grains. Month two: legumes. Month three: oils and vinegars. By month six you’ll have a pantry that feels genuinely stocked without the sticker shock of trying to do it all at once.
Start With the Shelves You Have
You don’t need a dedicated pantry room, a root cellar, or custom shelving to start. A few shelves in a closet, a corner of a cabinet, or even a sturdy bookcase in a cool room will do the job.
The homestead pantry is not built in a day. It’s built intentionally, one category at a time, until you reach for something and it’s always there. That feeling — of opening the pantry and having exactly what you need — is one of the quiet wins of this life.
If you’re just getting started and wondering where to begin, read how to start a homestead on a small budget first. The pantry is step six. That post will walk you through steps one through five.
“Real bread. Real life. Real ranch. — Ella”